Introduction
Anyone who has spent time developing recipes in the Yocto project knows the routine all too well. Make a change to a recipe, rebuild the image, reflash the board, reboot, test, and repeat. Even with an existing sstate cache, that loop can eat up a surprising amount of your day, especially when the change you are testing is a single line in a single application.
What often gets overlooked is that bitbake is already doing most of the work needed to avoid this. Every recipe you build is split into packages (RPM by default in Poky) before it ever lands in an image.
This is not just a formality, either. When bitbake assembles an image in do_rootfs, it actually runs a package manager on the build host to install those packages into the image’s root filesystem directory, pulling in dependencies along the way, before bundling the result into the final image (ext4, wic, etc.). In other words, your image is already built from a package repository.
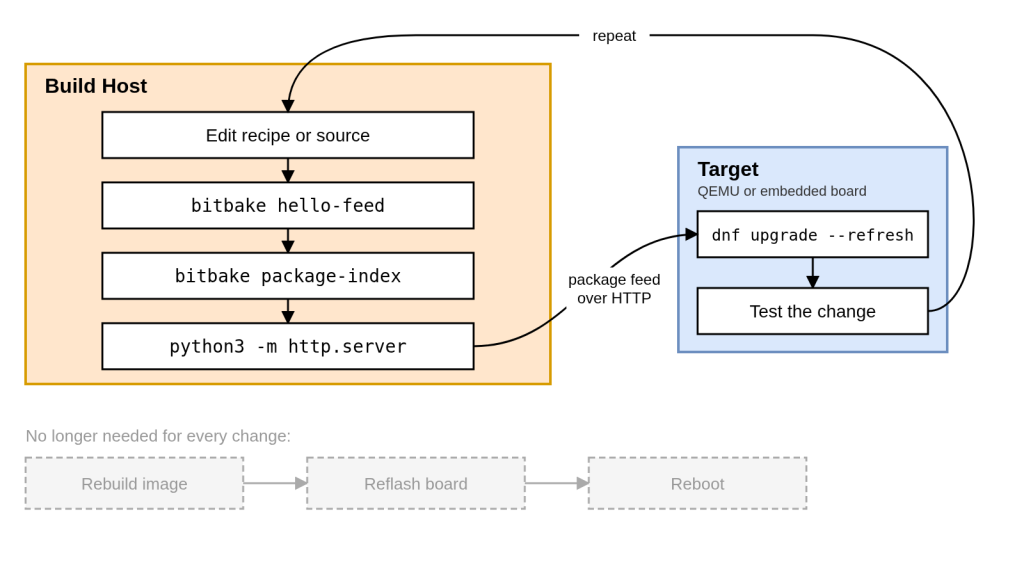
The Yocto project fully supports runtime package management, meaning those same packages can be served from your build machine and installed directly on the target using a package manager like DNF. Rebuild one recipe, install one package, and test. No reflashing required!
In this article, we will walk through setting up a local package feed from a Yocto build, pointing a target at it, and using it to iterate on a recipe. To make this easy to follow along without any hardware, we will use a stock Poky build for QEMU on Wrynose (6.0), the latest LTS release at the time of writing. The same steps apply to a real embedded board, just with a different IP address.
This article assumes the reader has some basic Yocto knowledge on how to set up a build, create a layer and write a simple recipe.
Warning
This is a development workflow. I do not recommend using package feeds as a way to update devices in the field. Installing and upgrading individual packages on a fleet of embedded devices quickly leaves you with systems running combinations of software that were never built or tested together, with no clean way to roll back when something goes wrong. For field updates, an image-based solution such as SWUpdate, RAUC or Mender is a much better fit. Here, we are simply using the package manager to get changes onto a development target as fast as possible.
Setting Up the Build
Recent Yocto releases, including Wrynose, use bitbake-setup to fetch layers and create a build directory, rather than cloning the poky repository. We will set up a standard Poky build for the qemux86-64 machine:
$ git clone -b 2.18 https://git.openembedded.org/bitbake
$ ./bitbake/bin/bitbake-setup init --non-interactive poky-wrynose poky distro/poky machine/qemux86-64
$ . bitbake-builds/poky-wrynose/build/init-build-env
Next, we need a recipe to develop. Let us create a layer with a very simple “hello world” type application. I’m a big believer in keeping examples as simple as possible, so this will do just fine:
$ bitbake-layers create-layer ../layers/meta-feed-demo
$ bitbake-layers add-layer ../layers/meta-feed-demo
// meta-feed-demo/recipes-example/hello-feed/files/hello-feed.c
#include <stdio.h>
int main(void)
{
printf("Hello from the package feed!\n");
return 0;
}# meta-feed-demo/recipes-example/hello-feed/hello-feed_1.0.bb
SUMMARY = "Example application for package feed development"
LICENSE = "MIT"
LIC_FILES_CHKSUM = "file://${COMMON_LICENSE_DIR}/MIT;md5=0835ade698e0bcf8506ecda2f7b4f302"
SRC_URI = "file://hello-feed.c"
S = "${UNPACKDIR}"
do_compile() {
${CC} ${CFLAGS} ${LDFLAGS} hello-feed.c -o hello-feed
}
do_install() {
install -d ${D}${bindir}
install -m 0755 hello-feed ${D}${bindir}
}Now for the important part. We need to add a few lines to our local.conf so that the image is ready to pull packages from our feed:
# local.conf
EXTRA_IMAGE_FEATURES += "package-management"
PACKAGE_FEED_URIS = "http://10.0.2.2:8080"
PRSERV_HOST = "localhost:0"
IMAGE_ROOTFS_EXTRA_SPACE = "262144"
Let us break these down:
- Adding
package-managementtoEXTRA_IMAGE_FEATURES
This image feature does a couple of things for us. First, it adds the package manager itself to the image, which in the case of RPM meansrpmanddnf. Second, it keeps the package database on the target. Bitbake actually uses a package manager behind the scenes to assemble the root filesystem, but without this feature, it deletes the resulting database at the end of the build to save space. That leaves the target with no record of what is installed, which is exactly what we need DNF to know. This feature is also what tells the build to make use ofPACKAGE_FEED_URISbelow; without it, the feed setting is simply ignored. - Setting
PACKAGE_FEED_URIS
This tells the build to pre-configure the image with the location of our package feed, so there is nothing to set up on the target.10.0.2.2is how a QEMU guest using user mode networking reaches the host machine. On a real board, this would be the IP address of your build machine. - Setting
PRSERV_HOST
This one is easy to miss, but it is important for upgrading packages. When you rebuild a recipe after changing its source, the version and release (PVandPR) of the resulting package do not change on their own. As far as DNF is concerned, it is the same package that is already installed, and an upgrade will happily report there is nothing to do. Enabling the local PR service makes bitbake automatically bump the package release every time the output of a recipe changes. - Setting
IMAGE_ROOTFS_EXTRA_SPACE
This leaves some free space (in KB) on the root filesystem so there is room to install and upgrade packages.
Out of the box, Poky images do not allow logging in as root. For our QEMU example, the quickest way to get a shell is to enable the development fragment that allows root login with an empty password:
$ bitbake-config-build enable-fragment core/yocto/root-login-with-empty-passwordWarning
As the name implies, this leaves the root account wide open, so it is only appropriate for local development builds like this one. If you are following along on a real board that sits on a shared network, a better option is to give root an actual password using the extrausers class instead:
# local.conf
IMAGE_CLASSES += "extrausers"
EXTRA_USERS_PARAMS = "usermod -p '<hashed-password>' root;"
The hashed password can be generated on the host with openssl passwd -6. Be sure to escape each $ in the hash as \$, otherwise bitbake will try to expand it as a variable. Either way, make sure these settings stay out of your production build configuration.
Now we can build the image along with our recipe. Note that hello-feed is intentionally not added to IMAGE_INSTALL, as we will be installing it from the feed:
$ bitbake core-image-minimal hello-feedServing the Feed
Bitbake places all of its packages in tmp/deploy/rpm, sorted into sub-directories by architecture. Before DNF can make use of them, we need to generate the repository metadata (the package index):
$ bitbake package-index
$ ls tmp/deploy/rpm
noarch  qemux86_64  repodata  x86_64_v3
Along with the architecture directories, we now have a top level repodata directory, which indexes every package in the feed. This is what lets us point the target at a single URL.
Note
The Yocto docs specifically call out running package-index as its own step, rather than on the same command line as the recipes you are building, as bitbake does not guarantee it will run after the packages are created.
All that is left on the host is to serve this directory over HTTP. For development, Python’s built-in web server is perfectly sufficient:
$ cd tmp/deploy/rpm
$ python3 -m http.server 8080
Installing on the Target
Let us boot the image. In a second terminal (sourced into the same build environment), run QEMU with user mode networking, which does not require root access on the host:
$ runqemu nographic slirp snapshotThe snapshot option is needed here because the QEMU machines build compressed (.zst) root filesystem images, which runqemu will only boot from a temporary copy. This also means anything we install is discarded when QEMU shuts down, which is perfectly fine for our purposes, as we will do all of our work in a single session. If you would rather keep changes across reboots, add IMAGE_FSTYPES:append = " ext4" to your local.conf, rebuild the image to get an uncompressed copy, and boot it with runqemu nographic slirp ext4 instead.
Note
If you are used to older releases, you may be in the habit of passing the machine name to runqemu. With a bitbake-setup based build, the machine is already set by a configuration fragment, and passing it again causes bitbake to error out with a conflicting MACHINE assignment. Simply leave it off, and runqemu will pick it up from the build configuration.
Log in as root and take a look at the repository file that the build generated for us from PACKAGE_FEED_URIS:
root@qemux86-64:~# cat /etc/yum.repos.d/*.repo
[oe-remote-repo]
name=OE Remote Repo:
baseurl=http://10.0.2.2:8080
gpgcheck=0
Now we can install our package straight from the feed:
root@qemux86-64:~# dnf makecache
OE Remote Repo:                                  8.6 MB/s | 560 kB     00:00
Metadata cache created.
root@qemux86-64:~# dnf install -y hello-feed
Dependencies resolved.
================================================================================
 Package           Architecture      Version          Repository          Size
================================================================================
Installing:
 hello-feed        x86_64_v3         1.0-r0.0         oe-remote-repo     8.2 k
...
Installed:
  hello-feed-1.0-r0.0.x86_64_v3

Complete!
root@qemux86-64:~# hello-feed
Hello from the package feed!
The output above has been trimmed a bit for readability. Success! Our application was built on the host and installed on the target without touching the image.
The Development Loop
This is where the real time savings come in. Let us make a change to our application:
printf("Hello from the package feed, version 2!\n");Back on the host, rebuild the recipe and regenerate the package index:
$ bitbake hello-feed
...
NOTE: Tasks Summary: Attempted 933 tasks of which 915 didn't need to be rerun and all succeeded.

$ bitbake package-index
...
NOTE: Tasks Summary: Attempted 753 tasks of which 751 didn't need to be rerun and all succeeded.
Since only our recipe changed, bitbake has very little to do here. Compare that to rebuilding and reflashing an image! The Python web server can be left running, as it simply serves whatever is in the directory. On the target, we tell DNF to refresh its metadata and upgrade the package:
root@qemux86-64:~# dnf upgrade --refresh -y hello-feed
OE Remote Repo:                                  353 kB/s | 1.5 kB     00:00
OE Remote Repo:                                   21 MB/s | 560 kB     00:00
Dependencies resolved.
================================================================================
 Package           Architecture      Version          Repository          Size
================================================================================
Upgrading:
 hello-feed        x86_64_v3         1.0-r0.1         oe-remote-repo     8.2 k
...
Upgraded:
  hello-feed-1.0-r0.1.x86_64_v3

Complete!
root@qemux86-64:~# hello-feed
Hello from the package feed, version 2!
Notice the release of the package went from r0.0 to r0.1, without us touching the recipe. This is the PR service at work, and is exactly why we enabled it earlier. Over on the host, the web server log also shows the target pulling the new metadata and package:
127.0.0.1 - - [14/Oct/2026 14:09:55] "GET /repodata/repomd.xml HTTP/1.1" 200 -
127.0.0.1 - - [14/Oct/2026 14:09:55] "GET /repodata/f33f2fcf...-primary.xml.zst HTTP/1.1" 200 -
127.0.0.1 - - [14/Oct/2026 14:09:56] "GET /x86_64_v3/hello-feed-1.0-r0.1.x86_64_v3.rpm HTTP/1.1" 200 -
That is it! Edit, bitbake, dnf upgrade, and test. The same applies to any recipe in your build, whether it is your own application, a library you are patching, or a kernel module.
Configuring an Existing Image by Hand
If you already have an image on your board that was built with package-management but without PACKAGE_FEED_URIS, you do not need to rebuild it just to use a feed. The repository can be configured by hand. Yocto may not create the repository directory if no feeds were defined, so we start there:
root@qemux86-64:~# mkdir -p /etc/yum.repos.d
root@qemux86-64:~# vi /etc/yum.repos.d/local.repo
# /etc/yum.repos.d/local.repo
[local]
name=Local Yocto Feed
baseurl=http://10.0.2.2:8080
enabled=1
gpgcheck=0Tip
bitbake package-index generates metadata both at the top of tmp/deploy/rpm and in each architecture sub-directory, so you can either point at the top level as shown above, or add a separate entry for each architecture directory. Just do not do both, as the Yocto docs warn against mixing the two.
From there, the same dnf makecache and dnf install commands apply.
Summary
This article demonstrated how the on-target package manager can turn the slow rebuild, reflash and reboot cycle into a quick rebuild and install of a single package. By serving the packages bitbake already produces, enabling the PR service and pointing your target at the feed, you can iterate on recipes in a fraction of the time. Just remember to keep this a development tool, and leave field updates to a proper image-based update solution.
The Yocto Project can be a complex and challenging endeavor, but there are strategies and tools that can simplify the process. By providing clear explanations and free practical guidance, we hope to equip you with valuable knowledge that will smooth your Yocto journey.
Remember that you don’t have to navigate the complexities of Yocto alone. Partnering with a seasoned Yocto project expert, like Cornersoft Solutions, can provide invaluable support and expertise. Our organization can guide you through the intricacies of the project, helping you avoid costly mistakes and time-consuming setbacks. Engaging a partner like Cornersoft Solutions can enable you to confidently tackle the challenges of the Yocto Project and achieve your embedded Linux development goals.
Contact linux@cornersoftsolutions.com to learn how our Yocto expertise, development ability, coaching and guidance can benefit your organization.